I don’t know about you, but an off-center fan sounds like a nightmare. I get it, some open plan spaces are compartmentalized, which would balance everything out, but having to do it just because the ceiling joist isn’t in the “right” place? Not happening.
If you are like me and prefer centered ceiling fixtures, you might be in the same boat: wondering what to do when there is no joist at the midpoint of the room’s ceiling. Thankfully, manufacturers have come across this problem and created a great solution to it as well.


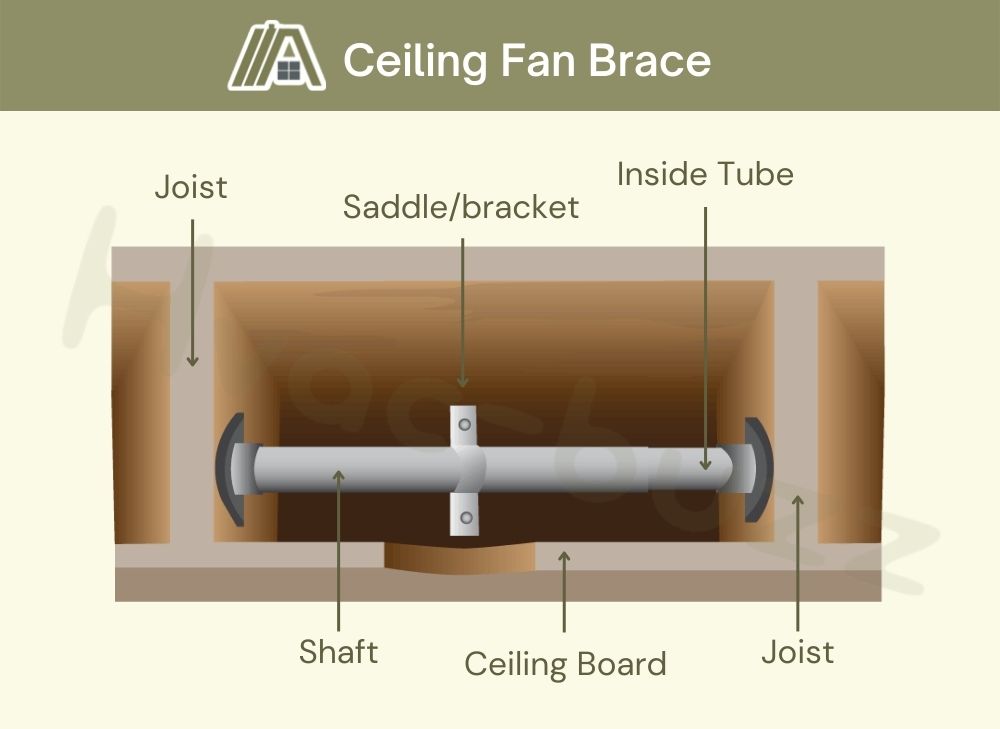
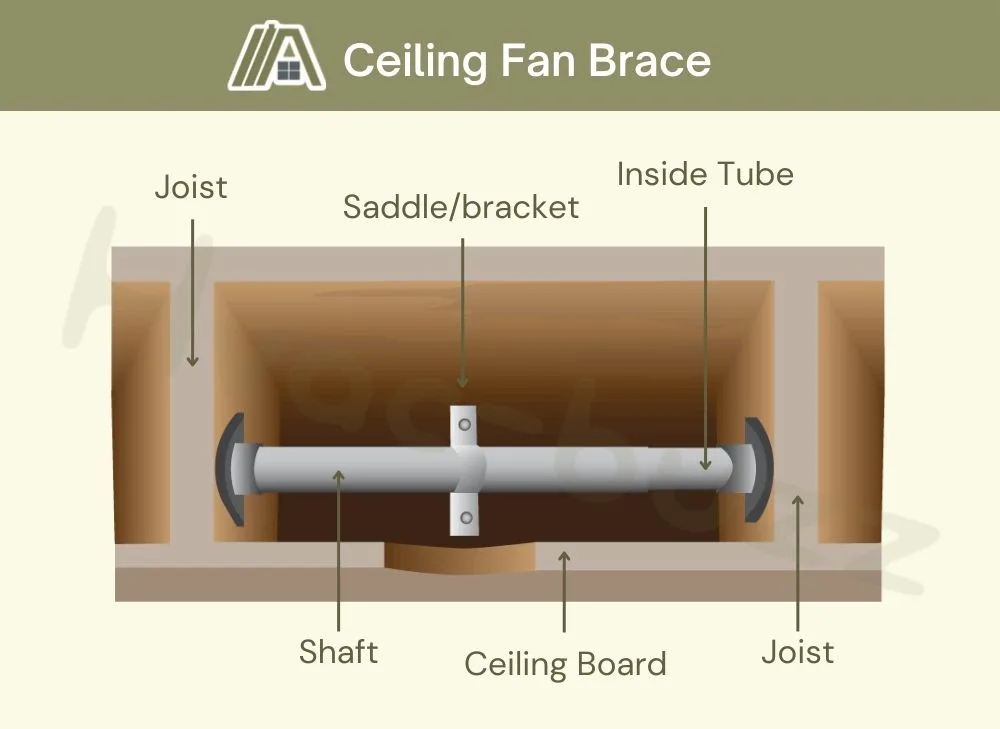
A ceiling fan can easily be installed without anchoring it directly to a roof joist. This is done by using a ceiling fan brace, a device with a metal shaft and a bracket. It is suspended between two joists and the fan box is secured to the bracket. This can also be done with or without attic access.
Difference Between Stud and Joist
You will notice that the title mentions both studs and joists. Many people, myself included, have been confused as to the difference between the terms, using them interchangeably. The truth is, however, that these are two different things.

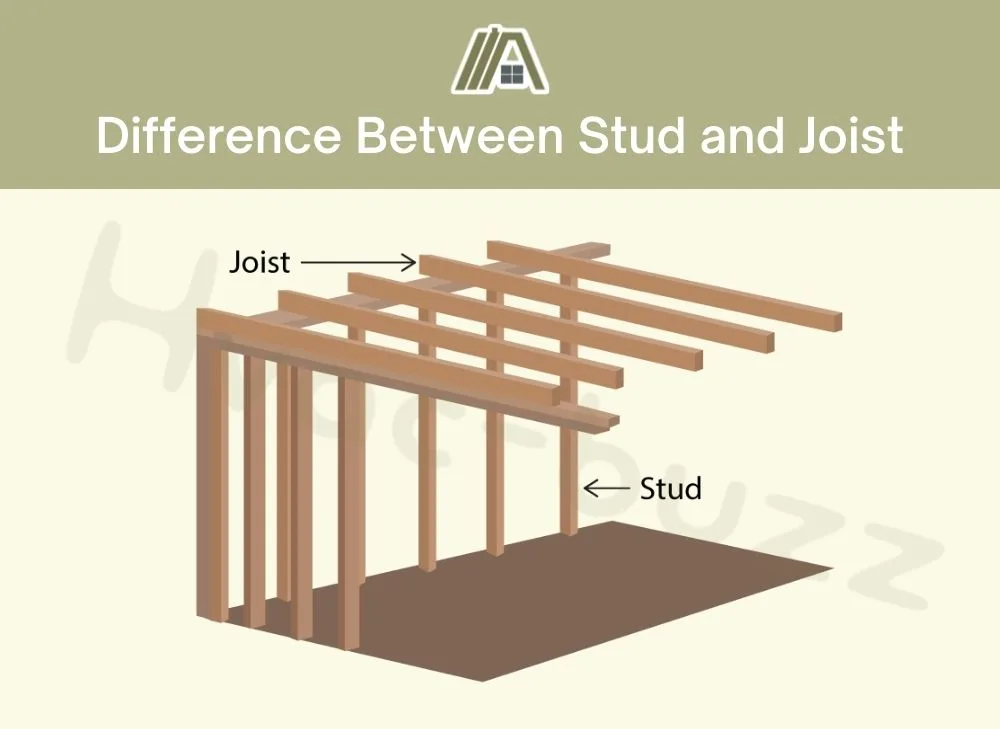
Both studs and joists are found in framing and they are supporting beams. However, when we talk about studs, we refer to the vertical beams in walls. Joists are the horizontal beams found in ceiling structures.
No Attic Access: Use a Ceiling Fan Brace
What Is a Ceiling Fan Brace?
A ceiling fan brace is an adapter for mounting a ceiling fan, comprised of a metal shaft with an inner tube for extension and a bracket (also known as a saddle).
Different braces may have different ratings, but if you follow the manufacturer’s recommendation, they will be strong enough to support the right fan.
Connected to the shaft is the mounting bracket. This is what the fan junction box is attached to. It has space for the house wires to be threaded through to reach the junction box and fan motor.
How Does It Work?
The ceiling joists are the only part of the roof structure that can support the weight of the ceiling fan. However, this is problematic when you are trying to place a fan in a room and the joists have a pre-set position that doesn’t cater to the fan placement.
This predicament is solved by the use of a ceiling fan brace.
The metal shaft is designed to run the distance between two ceiling joists, and it is screwed in place on either end. The inner tube twists in and out to accommodate a range of distances between two adjacent joists.
Because the brace is connected to two joists, it will provide the necessary support for the brace to hold the weight of the ceiling fan. Generally, mounts are rated for up to 50 lbs; beyond that, you will need a special brace for your fan.
A ceiling fan bracket is helpful in that it prevents your ceiling from caving under the weight of the fan, and it also helps prevent the fan from wobbling on an unstable/unbalanced anchor point.
What Sizes Are Available?
Your joists need to be relatively close together for the mounting system to work. This is because of how expansion affects the weight-bearing of the brace. Most braces can expand between 16″ and 24″.
Few fans exceed a weight of 50 lbs, which means that the mount needs to be able to support this weight, not only when static (standing still) but also when in motion.
The wider the brace is expanded, the lighter the fan you are installing needs to be. Most braces can support a fan of approximately 70 lbs at 16”, but only approximately 35 lbs at 24”.
Best Three Options
There are many different braces, but I have included three that many people use and seem to like.
1. Hubbell Raco 936 Retro-Brace
The Hubbell Raco brace (amazon link) is made from steel alloy and can be used for mounting fans and light fixtures when ceiling access is limited. It’s intended to be easily installed and comes with the necessary hardware (such as screws and bolts) and instructions for the job.

Pros
- 16-24” expansion.
- It can support a fan of up to 70 lbs at 16” expansion.
- It comes with hardened screws to provide further support for the fan or fixture.
Cons
- It can only support 35 lbs at 24” expansion.
- It only has three bottom knockouts for wiring.
2. Westinghouse Lighting 1400000 Saf-T-Brace
The Westinghouse Lighting 140000 brace (amazon link) is an easy-to-install metal brace that is designed to work as a universal brace that can accommodate all fan models. It comes packaged with all the hardware required to install the appliance and can be used without attic access.

Pros
- 16-24” expansion.
- It can support up to 70 lbs at 16” expansion.
- It has six conduit spaces in the bracket.
Cons
- It can support less weight the further it is expanded.
3. Westinghouse Lighting 0110000 Saf-T-Brace
The Westinghouse Lighting 0110000 brace (amazon link) is a metal brace that is intended as a universal mount and can be used for installations without attic access. It is designed to be easy to install and contains the necessary hardware and instructions for the installation.
")
Pros
- 16-24” expansion.
- It can support a fan of up to 70 lbs at 16” expansion.
- It has six conduit knockouts.
Cons
- Weightbearing capability decreases with expansion length.
What You Will Need For Installation
Below are some tools you will and may need depending on the situation of your project.
| Item/Tool | View on Amazon |
| Adjustable wrench | View |
| Drill (cordless) | View |
| Drywall cutter/keyhole saw | View |
| Dust mask | View |
| Headlamp | View |
| Ladder | View |
| Pliers | View |
| Safety glasses | View |
| Screwdriver | View |
| Stud finder | View |
| Voltage tester | View |
| Wire cutter and stripper | View |
Hanging a Ceiling Fan With a Brace
1. Turn off the Power
Before working with any wiring, you should shut off the power at the breaker box. After shutting off the power, you should also test the wires with a current detector or voltage tester to ensure no wires are live (which can happen when there are faults) and it’s safe to begin.
You will be connecting the fan to “house” wires that have (ideally) been run/laid/installed by a licensed professional.
You should keep the power off until you have completed the installation, as even if you are done with the wiring, you are still working with the metal casings and components of the fan unit.
If you become concerned or unsure about the wiring or your electrical system at any point, please call a professional immediately. Electricity is hazardous and can significantly damage you and your house.
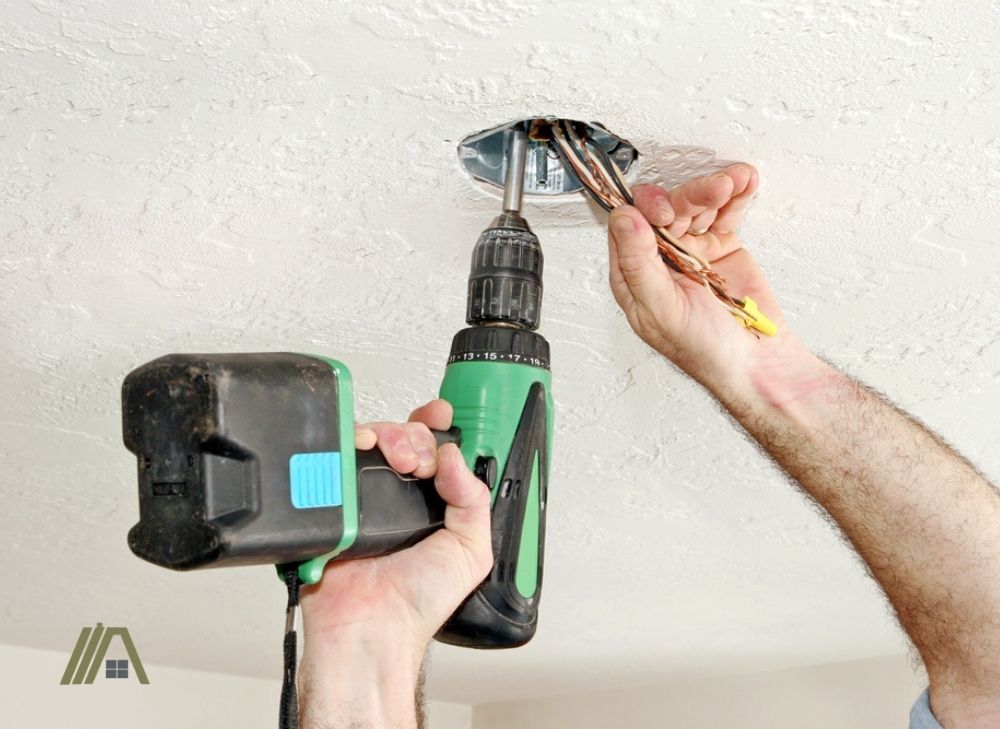
2. Measure How Big the Hole Must Be
The brace can be installed without attic access, but it will need to go through a hole in your ceiling (some products may indicate the size). However, the junction box also needs to fit through this hole.
Measuring the box will tell you what size you need to make the opening. You can either use the box itself or measure the size of the box. Then, once you have established how big to make the opening, you can measure out and mark the dimensions using a measuring tape or ruler (or the box!) and pencil.
A drywall saw is the best tool for the cutting process, but you can use an appropriate alternative if you have one. This will probably be quite messy, with a lot of dust. I recommend laying down a tarp under the work area and wearing protective eyewear and a mask.
A vacuum would also come in handy. You can use it as local extraction if you tape the host to the top of the ladder or have someone hold it near the ceiling for you while the hole it being cut.
3. Locate the Joists
You need to know where your ceiling joists are sitting in order to secure the brace to them. You may have already done this to know that you need a ceiling fan brace, but you are going to need to repeat it for the placement of your fan.


A stud locator is the best tool here (unless you have the gift of x-ray vision), which will tell you where the joists are through the ceiling boards. You will need to mark where the joists are on either side of the spot you plan to install the ceiling fan.
You will then need to measure the distance between the joists to know how far you will need to expand your brace.
4. Install the Ceiling Fan Brace
Insert the brace’s beam through the hole in the ceiling by feeding one end into the ceiling and then rotating it into place.
On either arm (or end) of the brace, there are teeth that help lock the brace in place when you twist it into position. There are also little legs on each end that will rest against the ceiling and hold it in place while you screw the brace into the joists.
You will need to tighten the brace now that it is in place with a wrench (or suitable pliers).
Note: make sure you aren’t placing the beam too high up on the joists. The bracket rim must align with the ceiling.
The bracket can then be attached to the metal pole (generally with a U-bolt around the beam), screwing it into place. Slot the bolt through the beam before lifting the bracket onto it and tightening the nut to secure everything. This is what the fan box attaches to. It might have a cover plate that levels out the ceiling and covers wires, but not always.
It should be secure if your brace and bracket are firm and don’t wobble or shift up and down when you try and wiggle it all. Remember, it needs to hold the weight of the fan! If you have not tightened the connections enough, the system will feel unstable.
5. Attach Junction Box to Bracket
Now, you can attach the fan’s junction box to the bracket of the mount. These brackets are generally designed to accommodate multiple fan models, so it is just about connecting according to how the box fits.
You will need to screw the box into place and thread the relevant wires through the bracket for the fan motor.

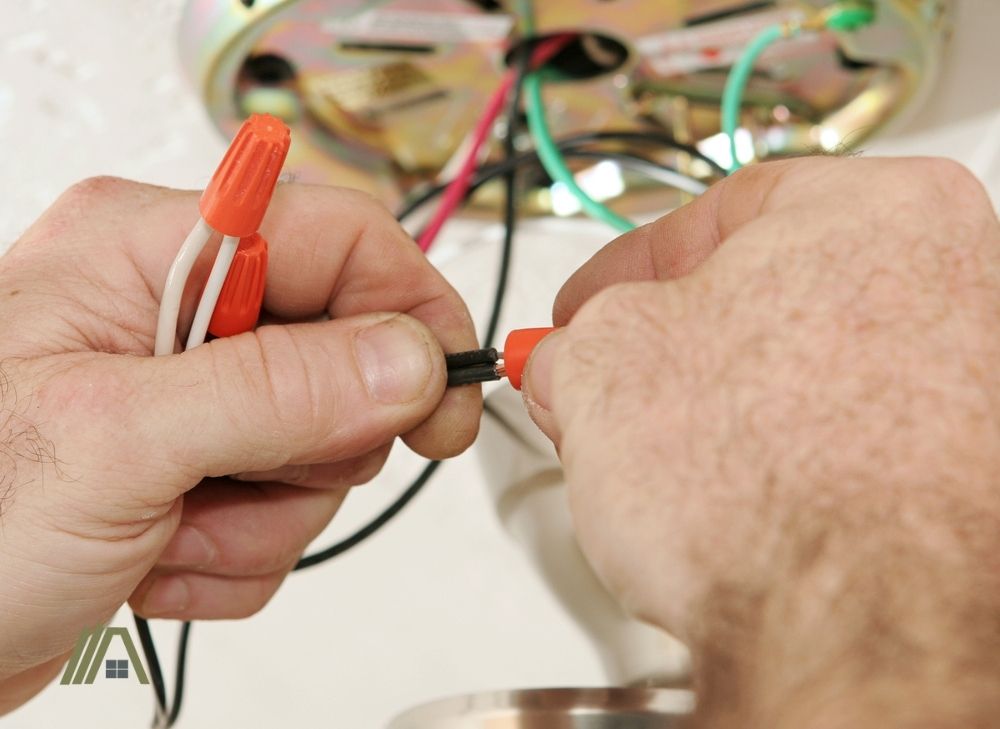
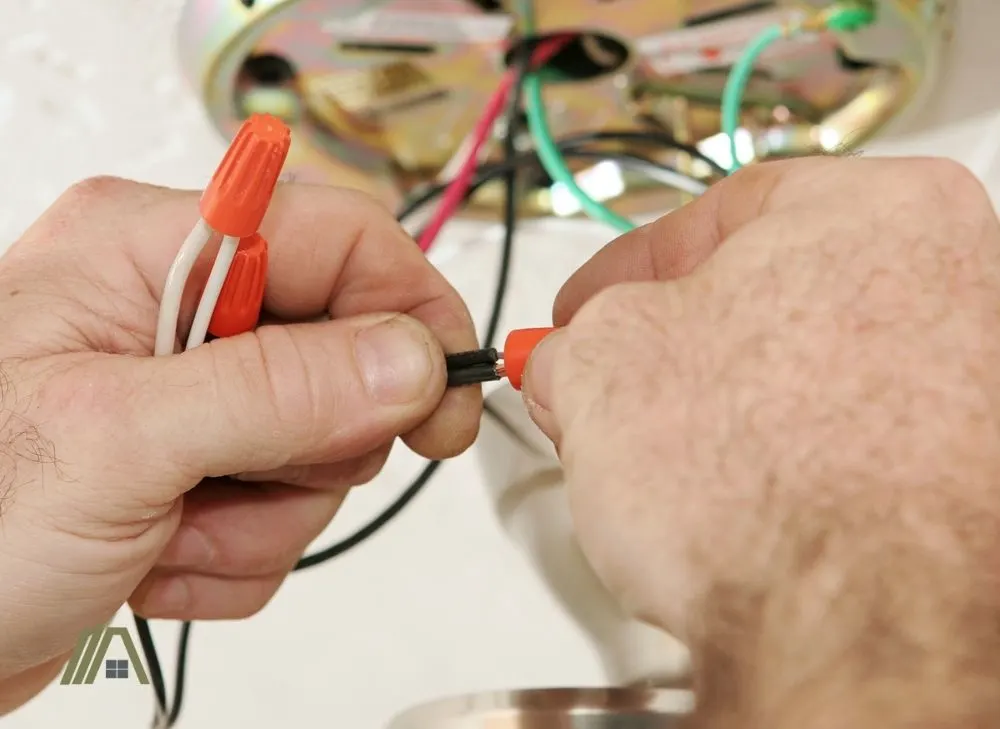
This is the step when you attach the bare copper wire from the cable to the box’s grounding screw. You should only need to twist it around the screw.
6. Hang the Fan Motor
When you have a downrod, you will need to thread the wires through the pole to the fan motor that will attach at the opposite end where the rod is attached to the junction box. If you need to trim any of the wires, be sure to leave it long enough that 6” of length will protrude from the downrod.
You can use wire strippers to take about 0.5” of insulation off the ends of the wires and thread it all through the rod, before tightening the rod onto the motor. You will need to put the setscrew (that you will have removed earlier) onto the motor coupling, and you should finish off by tightening it will some pliers.
You should also check the manufacturer’s instructions for if the cowl (this covers the hole in the ceiling) needs to be put onto the fan before you attach it to the mounting bracket. But generally, you pull everything through the cowl and just rest it on the motor unit until later.
Now you need to slot the motor and all its add-ons into the bracket and rotate it until it clicks into position.
7. Connect the Wiring
Now you will need to connect the wiring for the different aspects of the fan. Depending on where you live, you may need this done by a licensed professional. Or, you may need to have a professional sign-off on the electrical work for compliance purposes.
However, you can do the wiring yourself if you are confident in your skills. Note: it’s important to keep the grounding wires separate from the others by putting them on opposite sides.
The following is the basic wiring guide for a remote-controlled fan. If yours doesn’t have this function, it should be simple enough to see which steps to skip or adapt.
Fan and Receiver
Connect the bracket, ceiling, and downrod grounding wires together with a wire nut. Now, you are playing a color-matching game between the fan wires and the receiver “to motor” wires, which you will connect with wire nuts.
Connect the following wires with wire nuts:
- Black fan + black receiver “to motor”.
- White fan + white receiver “to motor”.
- Blue fan + blue receiver “to motor”.
Receiver and Supply
Now you are matching ceiling and receiver wires. Connect the following wires with wire nuts:
- Black ceiling + black receiver “AC in”.
- White ceiling + white receiver ‘AC in”.
Push these up into the outlet box, but take care to keep the grounded and ungrounded wires separate and not let any of the connections get caught or pinched.
Wall Controller
Lastly, you need to wire the wall control if you have it. Open the switch plate and pull the wires free so you can work with them.
Connect:
- Black wires in the bracket.
- Wall switch grounding wires + two green outlet box wires.
You can push these connections into the outlet box. The wall control must be screwed into place in the bracket, and then you can replace the switch plate.
There can also be variations to the wiring system if it has any extra features. For example, if it has a light included.
8. Secure the Cowl
Once you have connected the wires, make sure they are pushed into the box. Now it is time to secure the cowl or canopy to the ceiling. This is a decorative finish for the fan that covers the wiring and opening at the ceiling and makes it all look neat.
You will need to screw this into place over the fan motor. You will need to slide it up to the bracket and align the screw holes on the two pieces. Then it is a simple matter of fastening the screws.
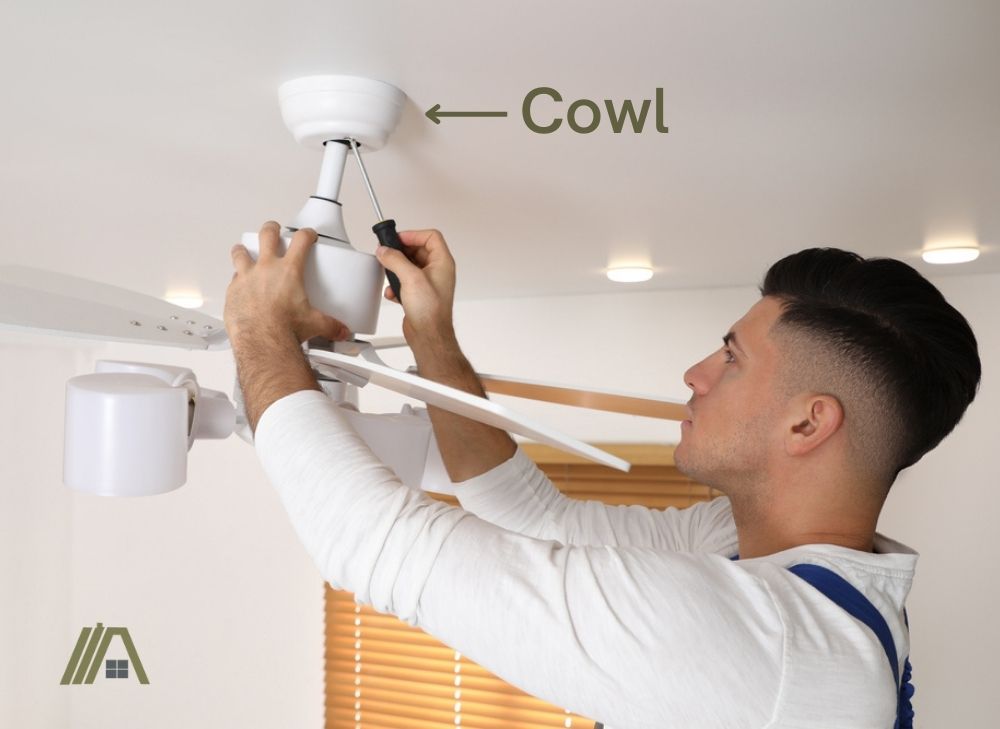
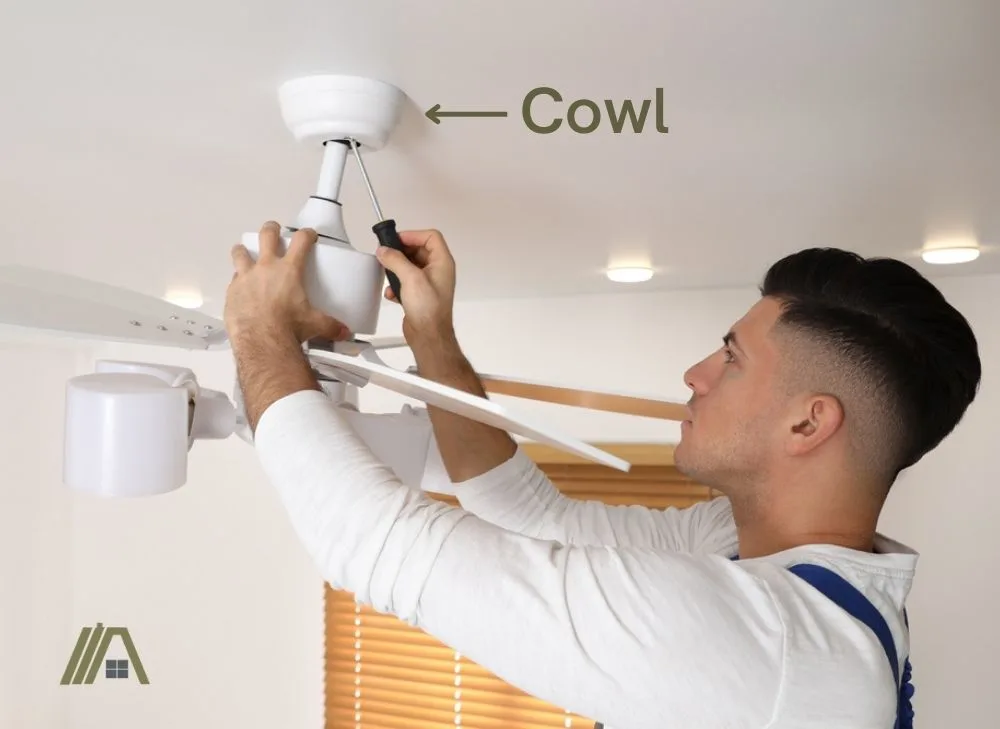
But be aware and check the manufacturer’s instructions; some models require you to fit the cowl to the unit before attaching it to the mounting bracket.
9. Attach the Blades
The last thing to do for assembling your fan is attach the fan blades. Ensure that the fan’s switch is in the off position, just to be safe so that the blades won’t start turning with your fingers nearby if there is an electrical glitch.
To attach the blades, you need to connect the blades to the blade irons (or brackets) as this is the part that is screwed onto the fan motor. Screw the paddles on, but don’t tighten the screws fully until all blades are in place. Check that everything is secure.
You can also double-check the wall, floor, and ceiling clearances. I have written an article on ceiling fan clearances, which provides the different clearance ranges and help with alternative ceiling heights.
You can attach the light fixture and bulbs at this point if they are part of the fan unit.
10. Turn on the Power and Check the Fan Works
After securing everything in place, the final step is to turn the power back on and test whether the fan is operational. Ensure that the fan’s switch is “off” and that all hands, heads, and tools are clear of the fan before restoring the power.
Once the power supply for the fan is on, you can check if the fan works. Try switching the fan through all its modes and functions. The blades should be rotating smoothly, there should be no wobbling or shifting, and there should be no loud clicking, scraping, or clunking sounds.
Alternative When There is Attic Access
The brace system is still a functional solution, but when you have attic access, you have the option to alter the process by adding some structures in to help with the installment.
You can still just install the mounting brace between two joists, but you can do this from the attic side. Or you can modify the above steps slightly.
With attic access, you have the ability to secure a wooden block between two joists in the vicinity of the fan’s placement. Then, you can directly screw the fan’s junction box onto this block, which would act in the same function as a brace (if you make sure it is strong enough!). This would replace steps 4 and 5 of the above process, but the rest remains the same.
Sources
https://www.familyhandyman.com/article/how-to-install-a-ceiling-fan-brace/
https://diy.stackexchange.com/questions/169014/is-a-ceiling-fan-box-brace-required
https://www.thisoldhouse.com/ceilings/21016468/how-to-install-a-ceiling-fan
https://www.homequestionsanswered.com/what-is-a-ceiling-fan-bracket.htm
https://www.bhg.com/home-improvement/electrical/installing-ceiling-fan-box/
https://www.delmarfans.com/educate/basics/how-to-install-a-ceiling-fan/