Bathroom ventilation is vital for healthy indoor air quality and for the prevention of moisture damage to the house. Exhaust duct insulation can seem like a trivial matter, but as we find out it is very important.
Insulating the duct cheap insurance against brown stains on the ceiling. The stains are usually caused by water that is condensed in the duct. If enough water collects it will start dripping down back into the bathroom.
In some cases, if the climate is very hot, and the indoor temperature is kept very low the condensation can even form on the outside of the uninsulated duct. Over time this can cause moisture damage that is hidden in the attic or elsewhere in the house construction.
Let’s take a look at where a duct could be placed and whether all of the places require insulation.


The bathroom exhaust duct should be insulated when it passes through an unconditioned space. This means that the temperature of the space is not controlled. Most exhaust ducts run through an unheated/cooled attic and must be insulated to prevent condensation inside and outside of the duct.
Exhaust Duct in An Unconditioned Space
Running the exhaust duct through an unconditioned space and terminating it either through the soffit or through the roof is the most common solution for bathrooms that are on the highest floor of the house.
Find out if it is OK to vent a bathroom fan through a soffit.
While most common, it is also most susceptible to condensation forming inside or outside of the duct. The condensation forms when the temperature difference in and outside of the duct is large. Most attics are not heated during the winter nor cooled during the summer. This is why condensation is likely to occur there.
Importance of Insulating the Exhaust Duct During a Cold Winter
During wintertime hot humid air from the bathroom will move through the duct. In the attic, the temperature will likely be similar to the outside temperature. As soon as the hot humid air hits the cold duct wall it will condensate. Over time, when enough condensate has collected inside the duct walls it will slowly start to drip down.
Since the duct is not insulated the cold attic air will prevent the duct from heating up and water from the hot humid air will keep condensing in the duct until the fan is turned off. There would be no problem if this were to happen once or twice, but this happens every time someone turns on the exhaust fan in the winter.
An uninsulated duct is one of the reasons why a bathroom fan drips after taking a shower. While a dripping bathroom fan is just annoying and not causing any real damage, there can be more serious consequences to not insulating the duct. After a couple of months, it will result in brown stains around the bathroom fan. After a couple of years, the constant presence of water in the duct can even start corroding the galvanized steel duct.
Uninsulated ducts also contribute to heat loss through a bathroom exhaust fan.
The warm exhausted through the duct will be able to heat up the walls of the duct only if the duct is insulated
Even if the duct is insulated, initially a small amount of water will condense on the duct wall. This is nothing to be worried about. After a couple of minutes, the warm air will heat up the duct wall enough for the condensation to stop.
It is vital that the insulation covers 100% of the duct. Even if a small spot is not covered it will be enough for condensation to form and cause problems. Take care when installing the insulation and make sure to seal the seams with quality HVAC tape(amazon link).
If you are hesitant to use fiberglass because of the irritation and general unpleasant nature of working with it. I can recommend cotton duct wrap. While it is more expensive, it is a pleasure to work with.
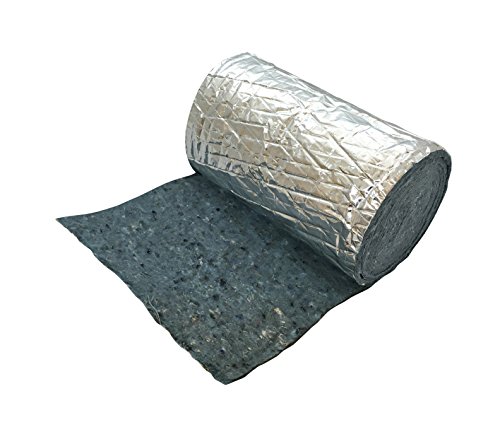
- Insulates, cushions, and reduces vibrations on heating and AC ducts
- Safe alternative - no gloves, face Mask, or goggles needed
- Class a fire rating
- Provides maximum insulating power
Last update on 2024-03-27 / Affiliate links / Images from Amazon Product Advertising API
Theoretically, if exhausting through the side of the house the condensation could be lead out of the house by angling the duct slightly outward. While this will stop the water from leaking back into the bathroom, it won’t stop the duct from corroding. If using flexi duct it is very hard to avoid dips in the duct run. Water will collect in any low spots. If the low spot is low enough it could even fill the entire duct, rendering it useless.
This is why I highly recommended insulating the duct in all cases. Even if you plan to angle it so that any water in the duct will drip out of the house. Insulating the duct is such an easy and cheap way to prevent all of the problems listed above, I see no reason why it should not be done.
Don’t Forget to Place Insulation Over the Bathroom Fan Itself
Most modern bathroom fans are so energy efficient that they do not generate enough heat to cause any problems when insulation is placed directly on top of them. However, there are a couple of things that must be considered when insulating above the fan housing.
Leaving the fan uncovered will drastically reduce the energy efficiency of your home.
Insulating the Exhaust Duct Will Make A Condensation Trap Unnecessary
A condensation trap is a dip in the exhaust duct that is meant to stop water from dripping back into the room.
If an exhaust duct is insulated, there is no need for a condensation trap, since the duct wall will quickly heat up, and condensation will not form on the walls of the duct.
Importance of Insulating the Exhaust Duct During a Hot Summer


Depending on where you live. An uninsulated exhaust duct could even cause problems in the summer.
Before we talked about how an uninsulated duct will condense water inside the duct. This happened because the unconditioned space where the duct ran through was cold and the air inside the duct was warm. During the summer the roles are reversed.
Now the unconditioned space will be hot. (very hot if it is an attic) And the air inside the duct will be cold. This can only happen if the indoor air is air-conditioned.
In places with hot and humid climates, there is a real possibility for the duct to sweat on the outside. The water condensing on the outside of the duct will eventually find its way back down to the bathroom.
This causes brown stains around the bathroom fan. Depending on how your house is constructed, it could cause a lot of damage over time. The brown stain around the bathroom fan is only the tip of the iceberg. Since the exhaust duct is likely wet the entire way down to the bathroom, there is a high risk of hidden moisture damage.
The more humid the air the more water will condense on the cold duct. So if you happen to live in a place with permanently humid air like Florida the problem will be ten times worse compared to a dry desert climate.
Should a Exhaust Duct in a Floor/Wall Be insulated
In a 2 story or higher house, the first-floor bathroom exhaust duct will be likely installed in the ceiling.
Since the ceiling of the first floor is between two temperature-controlled rooms, the temperature inside the ceiling construction will be equal or very near to the room temperature.
This in turn means that, even if the duct is not insulated, there is no risk for condensation to occur either inside nor outside of the duct.
So should you leave the entire duct uninsulated?
Well…no. Even though the ceiling construction temperature is equal to the room temperature, the damper on the wall cap will let some of the cold air in. This is especially true in air-tight homes while running another exhaust fan. Cold air will be sucked through the leaking backdraft damper.
Since the damper itself is a thin sheet of steel, it will not insulate the duct from the cold. This means, even if the damper is air-tight, the duct will still cool down space a few feet from where the damper is located.
Here is a helpful guide if you would like to learn more about ventilation dampers.
The best solution from both an energy-efficiency and condensation prevention standpoint is the following.
Install a wall cap without a damper*(amazon link). Right after the wall cap install a quality spring-loaded rubber-sealed damper(amazon link) and finally insulate everything(including the damper) at least 4 feet from the wall cap.
*Avoid wall caps with integrated dampers as they tend to be very noisy when it’s windy outside. Instead, opt for a quality damper further down the duct. The wall cap I linked to is chosen deliberately without a wire mesh, as this will greatly increase the static pressure of the whole duct. This in turn will make the exhaust fan much less effective. The damper, that you will place right after the wall cap will stop any insects and birds from entering the house.
This solution will keep the bathroom fan from drafting, eliminate condensation in the duct, increase your home’s energy efficiency by both keeping it airtight and as a bonus will keep wasps and other insects out of your home and ventilation system.
What Else Besides Insulation Should Be Kept in Mind When Installing A Exhaust Duct
While lack of insulation will not affect the function of the exhaust fan, some factors could render it completely useless. Here are some things that should be kept in mind whenever installing an exhaust duct.
Size Matters
No matter what they tell you, size does matter. At least when it comes to exhaust fan duct size.
An undersized duct will not be able to exhaust the rated CFM of a high-capacity exhaust fan. I know from first-hand knowledge. Years ago I installed a 4″ duct for a range hood while it required a 6″ duct. It goes without saying that It did not work. There was no difference between speed 1 and speed 3 since the duct was undersized. After switching to a 6″ duct, the highest speed setting was dramatically more powerful than the lowest.
Take a look a the illustration below to see the massive difference in surface area between a 4,6 and 8-inch duct. This will make it clear why my 4″ duct was not able to exhaust air at the rated CFM when it was designed for a 6″ duct.
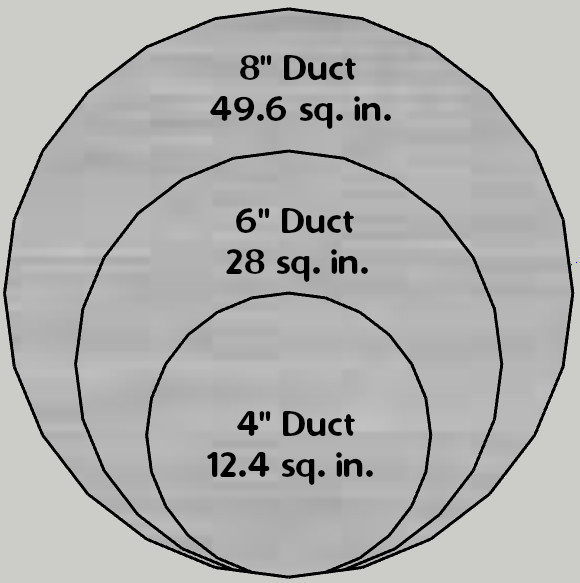
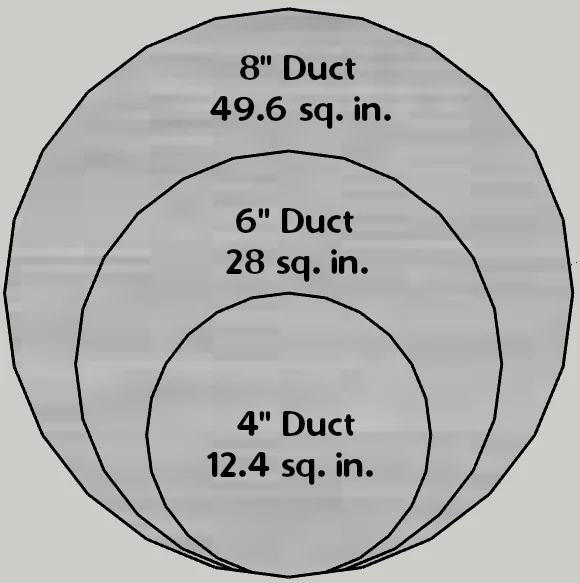
A 4″ duct has a dismal 12.4 sq. in. area compared to 28 square inches of the 6″ duct.
When in Doubt go Bigger
If your exhaust fan has a 6″ duct but comes with an adapter that converts it to 4 inches, be cautious. The fan is designed for a 6″ duct. The 4 ” adapter includes is done simply to broaden the market. It will allow people who have existing small ducts to use their fan. But in reality, it should never be done.
You can be sure that the noise level and CFM quoted in the spec sheet represent the performance if connected to a 6″ duct.
When connected to a 4″ duct, the fan will be much louder than specified, while not offering any additional airflow.
My suggestion, in this case, is to find a exhaust fan that is designed for the duct you have installed. This way you can rely on the info in the spec sheet and actually compare one fan to another.
When deciding between two sized exhaust ducts, always opt for the larger. There are no downsides.
If you have an existing exhaust fan with two duct options always install the larger size duct. So if the fan housing has a 6″ connection and it comes with a 4″ adapter. Install a 6″ duct.
Keep it Short
By keeping the duct as short as possible, you will make the fan more energy-efficient and depending on the size and length of the duct could even increase the airflow.
Keep Straight
Air likes to move in straight lines. Any bend in the road will increase the static pressure of the entire duct. This is why it is important to avoid any turns in the duct run.
In some cases, when a low powered exhaust fan is connected to a long, complicated(many bends) duct, the exhaust fan could lack the power to overcome the static pressure and would not exhaust any air.
No need to worry about this too much, just avoid unnecessary and very sharp bends. If you need to turn the duct 90 degrees, it is better to use two 45 degree elbows instead of a sharp 90 degree one.
Keep it Smooth

A smooth inside surface of a duct will make it easier for air to flow. This is why modern cars are made with as few air gaps as possible. This will increase the aerodynamics and will make it easier for air to flow. Both, inside the duct and over the car.
While flexible air ducts are easier to install and transport. The inside of a flexible duct is not smooth at all. In order for the duct to be flexible, it must have ridges that allow it to bend. The ridges are like riffles that hinder efficient airflow.
Learn more about what kind of duct to use for venting a bathroom fan.
While flexible ducts do work. A smooth-walled metal or PVC duct should be preferred since it will provide better performance and energy-efficiency.
If you prefer to use flexible duct, an easy way to make it comparable to a metal duct is to oversize it.
If the exhaust fan calls for a 6″ duct. Install a 8″ flexible duct. Since the duct will be greatly over-sized, it will guarantee that the fan will perform as specified.
Conclusion

In almost all cases exhaust fan ducts should be insulated. The insulation will prevent condensation from forming both inside and outside the duct. Even if the duct is in a conditioned space the louver could let some cold air in to cool the duct and the space it occupies. This is why quality dampers should be used to prevent air leakage. Simple principles to keep in mind whenever installing a duct are as follows:
- Adequate duct diameter
- Keep the duct short
- Avoid unnecessary bends
- Prefer smooth-walled ducting
I hope you found this article helpful. I wish you luck in your current and all future home improvement projects.
Please vote below and let me know how I can improve this, and all the future articles.
Thank you!