You may not consciously notice that orange/red glow from the dryer until it’s no longer there. The glow is from your ignitor, and if you don’t see it, something has gone wrong.
Ignitors are essential to the heating process in a dryer and are tied in with several other key parts. If these parts fail or are faulty, you can be left with an ignitor that won’t glow. If there is no glow, there is no way to burn the gas to operate the machine. So, let’s see what you can do about it.


Several components can be related to an ignitor that won’t glow: the ignitor itself, power supply, flame sensor, thermostat, and door sensor. Most of these require getting to a part within the dryer (rather invasive) and then testing with a multimeter. Replacing a bad part is the likely solution.
Understanding the Gas Dryer Assembly
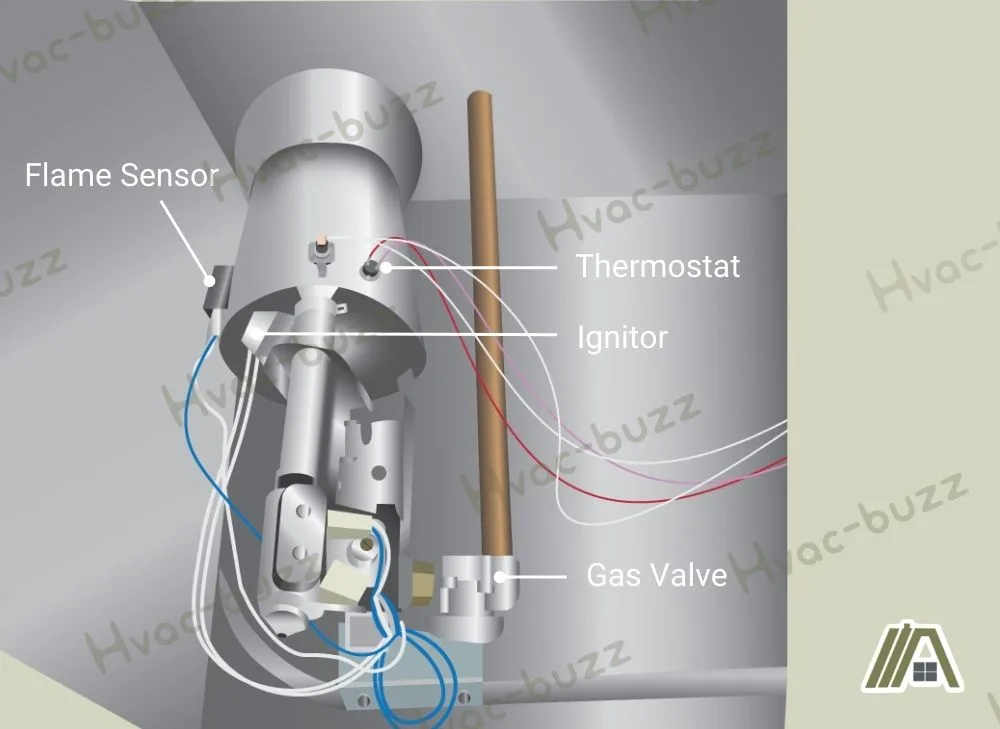
There is a whole system of components behind how a gas dryer works. Below are the parts of the gas assembly that relate to flame production and burning of the fuel gas:

Electricity Source
Gas dryers require electricity to power the controls, motors, and gas assembly. It is supplied to the appliance through a power cord plugged into a 120V outlet.
The Ignitor
The ignitor in the burner housing heats up using an electric current. This heat energy is used as a hot surface (glow) or a sparking mechanism. This is the lynchpin for the rest of the components to activate, so if you see a glow, it’s normal.
Flame Sensor
Dryer gas assemblies have a flame sensor to protect you and prevent fires. This monitors heat from the ignitor, sending a microamp current to the control board.
Gas Valve/Solenoid
The flame sensor’s signal allows the solenoid (gas valve) to open, permitting gas into the burner housing. If the flame is off or turns off, meaning the sensor no longer detects it, the gas supply is also shut off.
Thermostat
The high-limit thermostat reads the temperature of the air in the burner housing. If the temperature reaches a set “max” limit, it will shut off the gas assembly to prevent overheating and fires.
5 Reasons the Ignitor Is Not Glowing
Before we get started, you will need a multimeter, such as this KAIWEETS Digital Multimeter (amazon link) or this AstroAI Multimeter (amazon link). You can also use an analog version.

You need to test the resistance of the following components (this is a more accurate reading than continuity). Testing the resistance requires using the correct settings.
For a digital multimeter, you must be on the lowest resistance setting. This is the ohms function on the device (can be depicted by an omega “W” symbol) and, depending on the model, will likely be 200/X1. You can always confirm with the user manual.
An analog meter will need to be calibrated by pressing the leads together and adjusting the dial to the zero reading.
1. No Power Is Reaching the Ignitor
Electricity provides the energy that allows the ignitor to heat. Heat combines with the gas and oxygen to burn the fuel. So, if the ignitor isn’t getting electricity, it cannot heat up and glow.
If you have a blown fuse or a faulty outlet, it can be why there is an electrical supply interruption.
Wires tend to loosen or experience wear over time as they expand and contract repeatedly with electrical heat. They can also be damaged by bending or compression. This can result in incomplete connections within the dryer circuits or the outlets for your home.
Fuses can blow when there is a power surge (which grounding protects against) or if your exhaust ducts are not kept clear.
Confirming the Problem
You must leave the power on (you can call an electrician), unplug the dryer, and test the outlet receptacle with a multimeter on the AC (“V” with “~”) setting for voltage.
You can keep the leads in the same hand as a safety measure to prevent shock if you prefer (not allowing the metal ends to touch); the videos below show both methods.
Insert the black lead in the bigger, upper left slot and the red lead in the smaller top slot on the right. A functioning outlet receptacle will show a reading of around 110 or 120V.
You can also look at the fuse for the dryer, which will be on the blower housing or nearby the burner.
- Unplug the dryer and close off the gas valve.
- If there is a back or front access panel, you should be able to get to the fuse easily.
- Otherwise: open the lid, remove the front panel, unhook the dryer belt, and remove the drum.
When you have access to the fuse, undo the connectors and test the component’s terminals for resistance. If the reading is zero ohms, the fuse is fine.
Solution
- Shut off the main breaker for the outlet (make sure others in the house know it needs to be off).
- Before attempting to work on the wires, check that there is no current through the outlet using a multimeter. A zero reading shows it is safe to continue.
- Unscrew the outlet panel and check that all the wire connections are solid and not frayed.
- You can tighten the connections if they are loose.
- If the wires need replacing, you should call an electrician that can certify their work and keep you code-compliant.
- If your fuse shows an infinity reading, it is blown and needs replacing:
- Locate a new fuse online or from a store.
- Remove the old, blown fuse by undoing the mounting screws.
- Then, mount the new fuse.
- Attach the connectors to the component.
- Then all that is left to do is close the dryer up (replace the access panel or reassemble the dryer) and test that the machine is working again.
If you notice any frayed or damaged wires in your investigation, consider calling a technician out to take a look.
2. Ignitor Is Broken
The ignitor itself can be broken. These are very delicate components that will eventually burn out, or there can be a problem with electrical continuity.
So, if your ignitor is no longer working because of a breakdown of the metal or a lack of electricity, it will not be able to heat.
Not only will it fail to glow, but it will fail to light the gas. Air going into the dryer won’t be heated, meaning the main drying feature is unavailable.
This can happen over time as the component ages. The wires, connectors, and metal filament become damaged with use and eventually fail.
Or, this could have been faulty from production or from the filament being touched or damaged during manufacturing.
If you have had a power surge recently, it might have caused the ignitor to fry, but this indicates a larger problem since your home’s wiring system and the dryer fuses are intended to prevent this.
If your dryer isn’t heating, it might have something to do with a broken ignitor. You are going to need to check this.
Confirming the Problem
You need to get to the burner housing in the dryer, so you will need to disassemble the machine:
- Unplug the dryer and turn off the gas.
- Remove the lint filter from the lid OR front panel.
- If your lint filter is in the lid, undo the screws in the filter compartment that hold the lid down.
- Using a putty knife or similar tool, pop the corners of the lid free of their clips and flip it up.
- Remove the screws from either side of the casing that secure the top of the front panel and lift it off the bottom clips.
- Disconnect the door sensor wires and move the front panel aside.
- Take the dryer belt off the driver and idler pulleys.
- Lift the drum out of the shell by the dryer belt.
Now you will be able to see the gas assembly and long tube of the burner housing. At the front of the burner housing (it might be a little hidden) is the ignitor.
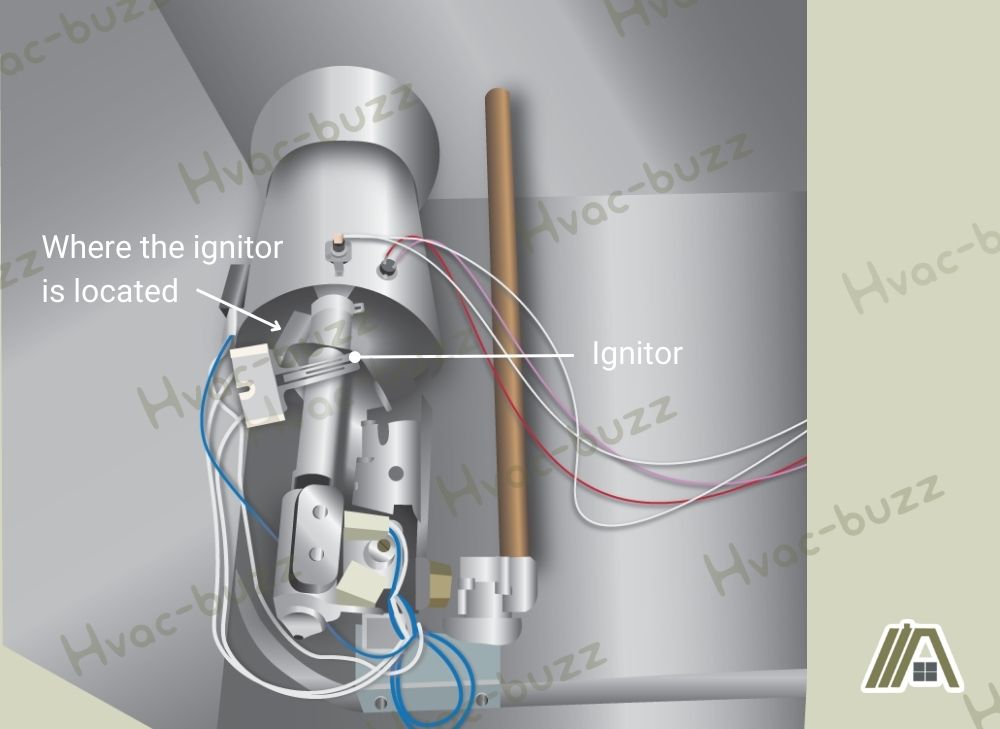
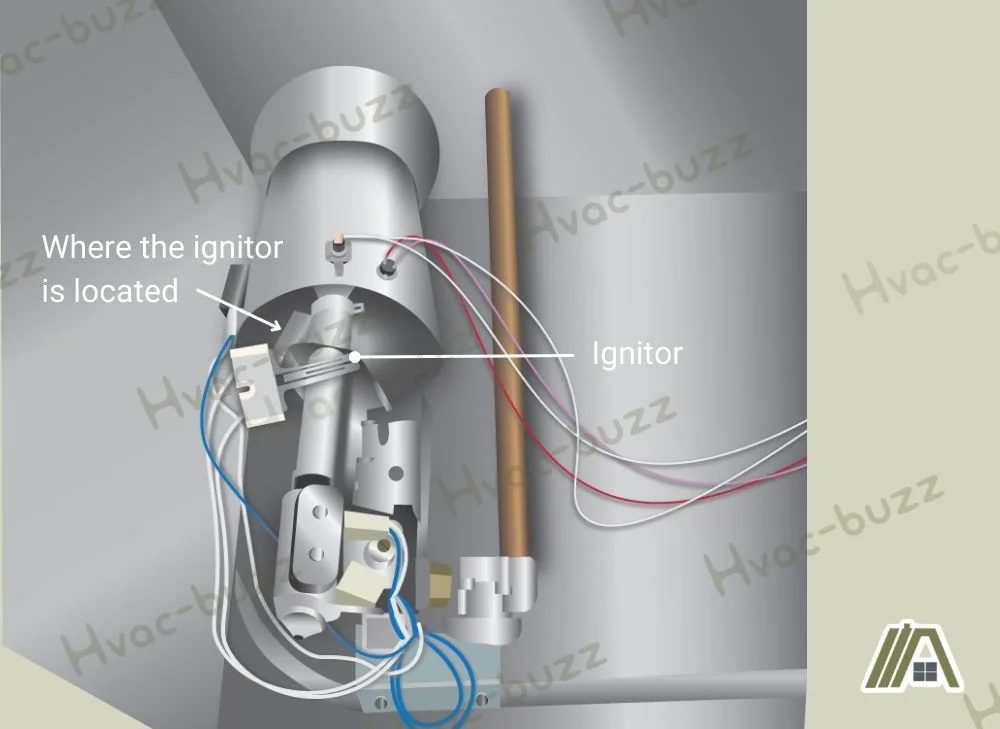
Remove the two dryer wires using pliers. You can also label the wires to remember which is which if necessary.
This video shows you where to find the ignitor by the burner housing and how to disconnect it:
Test the ignitor terminals: a 50 to 400 reading is normal.
You can also check for corrosion on the component terminals and the machine connectors, as this can interfere with the flow of electricity to the part, even intermittently, so your ignitor may glow sometimes and others not.
Solution
If the reading is infinity or zero, then your ignitor needs replacing.
Remember that if your dryer is under warranty, you will need to hire a technician to perform any testing, repair, or part replacement in the appliance.
- Find a new ignitor online or in a store.
- Remove the ignitor from its mount and mount the new part in its place. You need to be careful not to touch the filament as this can damage it and shorten the lifespan of the ignitor.
- If you find corrosion on the connectors and/or ignitor terminals, you will need to replace the connectors or replace the ignitor to address the terminals.
If you are uncomfortable with replacing such a significant part of the gas assembly, you can always hire someone, even if your dryer is no longer under warranty. It might set your mind at ease over any safety considerations.
You can even have the dryer serviced simultaneously to make the most of the call-out fee.
3. Broken Flame Sensor Interfering With Ignitor
If the dryer isn’t getting hot enough or the ignitor won’t work, it can be the flame sensor that is faulty or broken.
This can happen when there is an unsteady electrical supply to the dryer, which can strain the wiring. Age can also result in damage from use, or the component may have had a manufacturing weakness that causes it to break.
If the flame sensor fails, it cannot signal to the dryer when the ignitor is on and gas can be released or when the ignitor is off and the gas valve needs to close.
Confirming the Problem
The flame sensor is another part that requires getting under everything:
- Start by unplugging the dryer and shutting off the gas.
- Next, remove the lint filter from the lid (and screws in the compartment) OR front panel.
- Using a putty knife or similar tool, lift the lid corners and flip the lid open.
- Remove the screws holding the top of the front panel on and lift it off the bottom clips.
- Disconnect the door sensor wires and move the front panel aside.
- Take the dryer belt off the driver and idler pulleys.
- Lift the drum out the dryer by the belt.
The flame sensor will be attached to the burner housing, which is the black box with two wires attached to the metal tube.
If your multimeter gives a reading of zero when touching the sensor’s terminals, you know the sensor is fine and working. If the reading is anything else, the part is not working.
If your multimeter can read microamps (mA), you can check the part more accurately by attaching the meter in series between the wire to the gas valve and the sensor’s terminal.
This requires the power to be on and for you to get the reading as the burner is on. 0.5-10 microamps is normal.
Solution
If you did not get a zero reading you need, the flame sensor is likely the culprit, so leave the dryer dismantled.
- Find a replacement part online or in a store, and now you can swap the old flame sensor out.

- Unscrew the box from the burner housing and mount the new sensor in its place.
- Next, reattach the wires from the dryer and put your dryer back together.
- Once you have closed the machine up, you can check that the ignitor is now working.
- Plug the dryer in again and open the gas valve.
- Choose a high heat setting and let it run for a few minutes. If the dryer can run and is hot when you shut it off, you have solved your problem.
If your sensor reads at zero when testing for microamps, it still needs replacing.
Under 0.5 microamps, your problem might be that the sensor is dirty. In this case, remove the sensor and clean dirt from the part before putting it back.
4. The Thermostat Is Broken
If the high-limit thermostat is not working correctly, it might signal to the dryer that the temperature within the burner housing is dangerously high. In this case, the ignitor will shut off.
If this “too hot” signal is constantly being fed to the machine, it is possible the ignitor won’t even be able to turn on and get hot enough to glow before the safety features kick in. So, the air won’t be able to heat up.
The metal on the thermostat warps away from its contact as it gets hot, which signals the power to shut “off”. If your thermostat cannot return to its previous form, it fails to signal for power to be “on”.
Confirming the Problem
Now you may be able to open a front or back access panel to get to the thermostat. If your dryer has this feature, your job is relatively simple. Otherwise, you have the job of digging your way to it:
- Unplug the dryer and turn off the gas supply.
- Remove the lint filter from the lid (and screws in the compartment) OR front panel.
- Open the dryer lid by unclipping the corners with a tool.
- Remove the screws at the top of the front panel and lift it off the clips at the bottom.
- Disconnect the door sensor wires and move the front panel aside.
- Unhook the dryer belt off the driver and idler pulleys.
- Lift the drum out by the dryer belt.
You are looking for the thermostat on the burner housing.

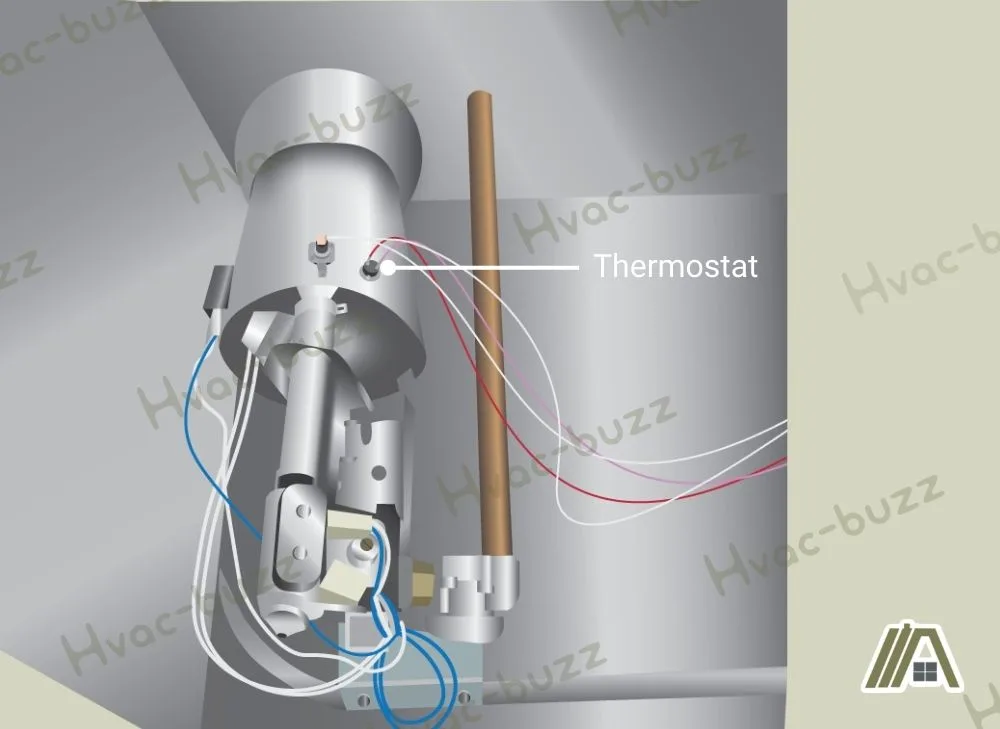
If obvious disfigurement is not present that indicates the thermostat is broken, you can test it for resistance.
Remove the wires from the component and touch the meter leads to the thermostat terminals. You shouldn’t get an infinite reading if the component is fine.
This video demonstrates how to disconnect thermostats and thermal fuses and test them:
Solution
If you did get an infinity reading, the solution is to replace the thermostat.
- Purchase a new thermostat.
- Remove the old thermostat from its mounting and fasten the new thermostat in place.
- Attach the wires to the replaced part and put your dryer back together.
- Plug the dryer back into its outlet and open the gas valve, then you can confirm if your dryer is back in working order.
You should hire a professional if you have any reservations about the part or dryer’s functioning since the thermostat is a crucial safety control.
I recommend keeping up with regular duct cleaning every few months. If there is a problem with airflow through the dryer’s ductwork, this can cause a buildup of heat that can trigger the sensor.
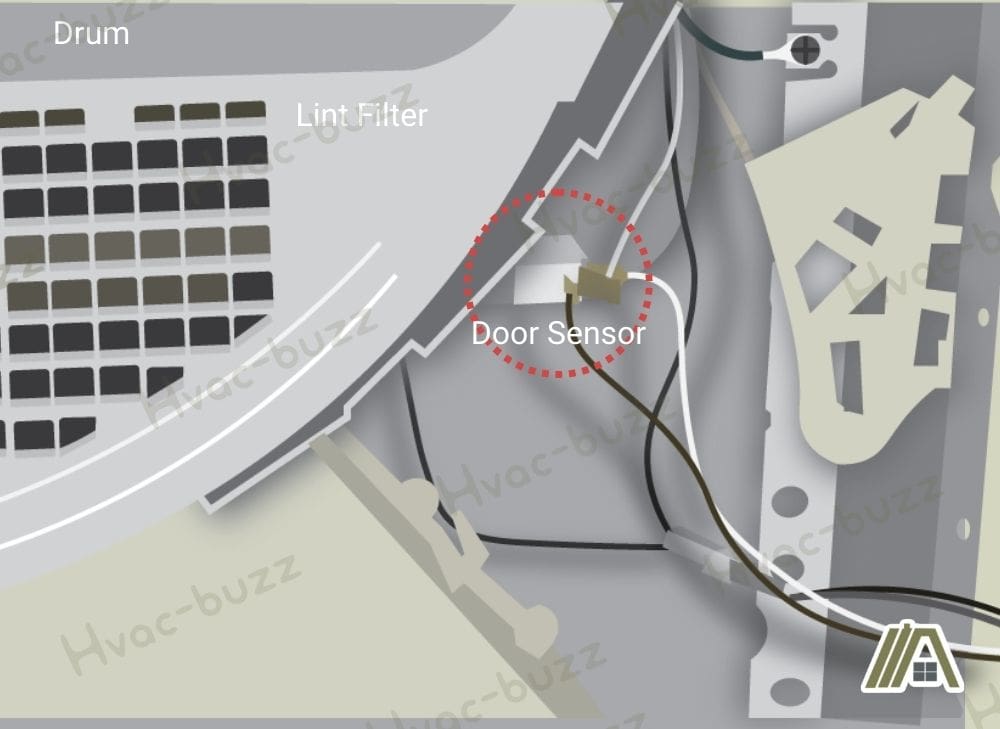
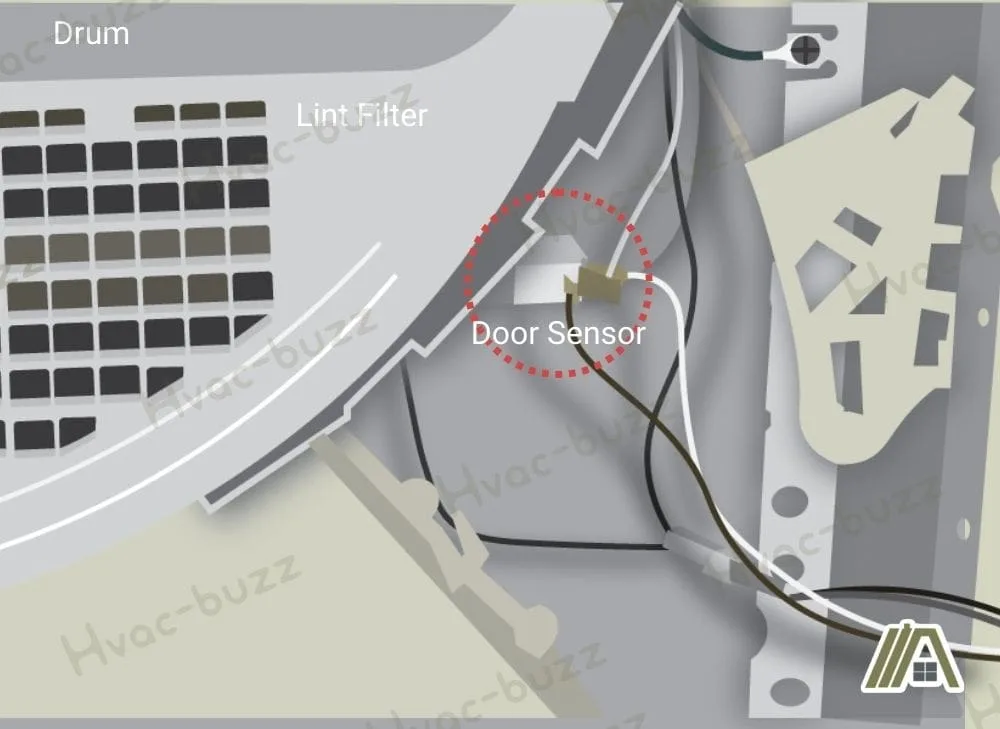
5. Door Sensor Is Broken
If your ignitor isn’t working, you might have a problem with the door sensor. This sensor is supposed to pick up on the contact saying the door to the dryer is closed and it is safe for the machine to start working.
If the door sensor (sometimes called the door switch) is faulty or broken, it cannot signal to the main control board that the door is closed and the dryer is good to run. You will be able to turn on the appliance and select the program, but pressing start will yield no results.
The good news is that the door sensor is one of the easiest parts to get to and check.
Confirming the Problem
Steps to opening and dissembling the dryer:
- Unplug the dryer and close the gas valve at the back, on the gas pipe.
- Remove the lint filter from the lid OR front panel.
- If your lint filter is in the lid, undo the screws in the filter compartment that hold the lid down.
- Using a putty knife or similar tool, pop the corners of the lid free of their clips and flip the lid up.
The door switch will be located in the right corner of the front panel. You can remove the front panel if you need more space to access the sensor.
You will need to unclip the connectors from the sensor’s wiring harness.
Next, touch the multimeter leads to the sensor terminals and check for resistance. The door sensor works if you get a reading that isn’t zero or infinite.
Solution
If you get a zero or infinite reading, the door sensor is broken, and you need to replace it.
- Locate a replacement part either online or from an appliance store.

- Unscrew the sensor from its mount and put the new part in place.
- Connect the new door sensor to the wire harness and close up the front panel and lid.
- Then you can plug the machine in again, open the gas supply, and try turning it on. If the dryer cycle can start and gets hot, you have solved the issue.
Sources
https://homeguides.sfgate.com/causes-dryer-ignitor-not-ignite-88863.html
http://www.acmehowto.com/howto/appliance/dryer/gdryer/check/ignitor.php
https://homeguides.sfgate.com/troubleshooting-dryer-door-switch-20643.html
https://homeguides.sfgate.com/troubleshoot-dryer-thermostat-62961.html
https://applianceassistant.com/appliance-repair/dryer-repair/how-gas-dryer-parts-work/
https://homeguides.sfgate.com/test-gas-dryers-igniter-multimeter-32453.html
https://www.bhg.com/home-improvement/electrical/how-to-test-an-electrical-receptacle/
https://www.thespruce.com/test-electrical-current-with-a-voltage-tester-1821569
https://diy.repairclinic.com/how-do-i-know-if-my-dryer-thermal-fuse-is-blown/
https://homeguides.sfgate.com/verify-thermal-fuse-burned-out-dryer-68761.html
https://homeguides.sfgate.com/test-defective-gas-dryer-flame-sensor-46710.html
https://mrelectric.com/blog/how-to-use-a-multimeter-to-test-an-outlet